Anúncios
Exploring the Skies: Google Earth’s Hidden Flight Simulator
Start Flying Now
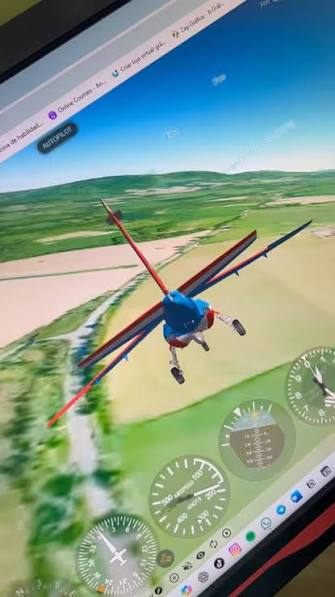
Did you know that Google Earth contains a fully functional flight simulator hidden within its interface? This remarkable feature transforms the popular mapping tool into an aviation playground where anyone can pilot virtual aircraft over real-world terrain.
Whether you’re an aviation enthusiast, a curious explorer, or someone looking for a unique way to experience our planet, this flight simulator offers an engaging and educational experience without requiring any special equipment or expensive software.
Anúncios
The flight simulator in Google Earth has been delighting users since 2007, yet many people remain unaware of its existence. Unlike traditional flight simulation software that can cost hundreds of dollars, this tool is completely free and accessible to anyone with Google Earth installed.
It provides a realistic flying experience over accurate geographical data, allowing you to soar above your neighborhood, navigate through mountain ranges, or land at famous airports around the world.
Anúncios
What Makes Google Earth’s Flight Simulator Special? ✈️
The flight simulator built into Google Earth stands out from other aviation games and simulators for several compelling reasons. Rather than using fictional landscapes or simplified terrain, it leverages Google’s extensive satellite imagery and 3D building data to create an authentic flying environment.
When you activate the flight simulator, you’re essentially piloting an aircraft over the same detailed maps that millions use daily for navigation and exploration. The photorealistic terrain means you can recognize landmarks, follow actual roads, and experience geographical features exactly as they appear from the air.
The simulator offers two aircraft options: an F-16 Fighting Falcon jet fighter and an SR22 propeller plane. The F-16 provides a faster, more responsive flying experience suitable for experienced users, while the SR22 offers gentler handling perfect for beginners learning the controls.
How to Access the Flight Simulator in Google Earth 🎮
Accessing this hidden feature requires just a few simple steps, though the method differs slightly depending on which version of Google Earth you’re using.
For Google Earth Pro (Desktop Application):
First, ensure you have Google Earth Pro installed on your computer. This desktop version is freely available from Google’s website and works on Windows, Mac, and Linux systems.
Once opened, you can launch the simulator in two ways. The keyboard shortcut method involves pressing Ctrl + Alt + A on Windows or Linux, or Command + Option + A on Mac. Alternatively, navigate to the Tools menu at the top of the screen and select “Enter Flight Simulator.”
A dialog box will appear asking you to choose your aircraft and starting location. You can select either the F-16 or SR22, and choose to begin at your current map view location or at a specific airport from the dropdown list.
For Google Earth Web Version:
Unfortunately, the flight simulator feature is not currently available in the web-based version of Google Earth that runs in browsers. You’ll need to download and install Google Earth Pro to access this functionality. The download is free and takes only a few minutes to complete.
Understanding the Flight Controls and Interface 🕹️
Once you’ve launched the simulator, you’ll find yourself in the cockpit with a heads-up display (HUD) showing essential flight information. Understanding these controls is crucial for a successful flying experience.
Basic Flight Controls:
The primary flight controls use your keyboard and mouse or joystick if you have one connected. The mouse or joystick controls the aircraft’s pitch (nose up and down) and roll (banking left and right). Moving the mouse up pitches the nose down, while moving it down pitches the nose up—this may feel counterintuitive at first.
The arrow keys provide additional control: Up arrow increases throttle, Down arrow decreases throttle, Left arrow steers left (yaw), and Right arrow steers right (yaw).
Additional important keys include:
- Page Up: Increase thrust/speed
- Page Down: Decrease thrust/speed
- Left Arrow: Rudder left
- Right Arrow: Rudder right
- G: Raise/lower landing gear
- F: Extend/retract flaps (helps with slow flight and landing)
- Spacebar: Center the view and level the aircraft
Reading the Heads-Up Display 📊
The HUD provides critical information about your flight status. Understanding these indicators helps you maintain control and navigate effectively.
| Display Element | What It Shows | Why It Matters |
|—————-|—————|—————-|
| Airspeed | Current speed in knots | Too slow and you’ll stall; monitoring helps maintain safe flight |
| Altitude | Height above sea level | Essential for avoiding terrain and proper landing approach |
| Heading | Compass direction | Helps with navigation and orientation |
| Pitch Ladder | Aircraft angle relative to horizon | Shows if you’re climbing, descending, or level |
| Throttle Indicator | Current engine power setting | Manages speed and climb rate |
The artificial horizon line in the center of your view shows whether your wings are level or banked. Keeping this line horizontal helps maintain steady flight, especially useful when visibility is limited or you’re disoriented.
Taking Your First Flight: A Step-by-Step Guide 🛫
Starting your first flight can feel overwhelming, but following these steps will help you get airborne and flying smoothly.
Pre-Flight Setup:
Begin by selecting the SR22 propeller plane for your first attempt. Choose a starting location with flat terrain and good weather conditions—Kansas City or Denver airports work well for beginners. Make sure “Current View” is not over mountainous terrain or water.
Getting Airborne:
When the simulator loads, your aircraft will typically start on a runway, though sometimes you may begin already in flight. If you’re on the ground, check that your landing gear is down (the indicator should show three green lights).
Gradually increase throttle using the Page Up key until your speed reaches approximately 80 knots. As you gain speed, gently pull back on the mouse or joystick to lift the nose. The aircraft should smoothly lift off around 90 knots. Once airborne, press G to retract the landing gear—this reduces drag and improves performance.
Maintaining Level Flight:
After takeoff, adjust your pitch to climb at a comfortable rate. A 10-degree nose-up attitude works well initially. Watch your airspeed—if it drops too low (below 70 knots in the SR22), you risk stalling. If you climb too steeply, your speed will bleed off quickly.
Once you reach a comfortable altitude (3,000-5,000 feet is good for sightseeing), level off by bringing the nose to the horizon line. Adjust throttle to maintain a steady airspeed around 120-140 knots.
Mastering Advanced Flying Techniques 🎯
Once you’re comfortable with basic flight, you can explore more advanced maneuvers and techniques that make the experience more engaging and realistic.
Coordinated Turns:
Proper turning involves more than just banking the aircraft. For smooth, coordinated turns, bank the aircraft using the mouse or joystick while simultaneously applying rudder in the same direction using the arrow keys. This prevents the aircraft from slipping or skidding through the turn.
A standard rate turn (one that completes 360 degrees in two minutes) typically requires about 15-20 degrees of bank. Steeper banks create faster turns but require more altitude management and higher speeds to prevent stalling.
Navigation Using Landmarks:
Google Earth’s realistic terrain makes visual navigation both possible and enjoyable. Before flight, use the standard Google Earth interface to identify distinctive landmarks along your intended route—rivers, highways, stadiums, or prominent buildings serve well.
During flight, cross-reference what you see through the cockpit with the terrain below. Major roads, coastlines, and mountain ranges provide excellent navigation references. This skill mirrors real-world visual flight rules (VFR) navigation used by actual pilots.
Flying in Challenging Terrain:
Mountain flying presents unique challenges requiring careful planning. When approaching elevated terrain, ensure you have sufficient altitude well in advance. Mountain waves and terrain can create turbulence not simulated in Google Earth, but altitude management remains critical.
Flying through valleys or between buildings (in areas with 3D structures) demands precise control. Start with wide valleys before attempting tighter spaces. The F-16’s higher speed makes precise maneuvering more difficult but more thrilling for experienced users.
Landing Your Aircraft Successfully 🛬
Landing represents the most challenging aspect of flight simulation for most users. Success requires patience, practice, and proper technique.
Approach Planning:
Begin your landing preparation several miles from your destination airport. Reduce throttle and start a gradual descent. A good approach speed for the SR22 is approximately 80-90 knots. Deploy flaps using the F key—this increases lift at slower speeds and allows for a steeper, more controlled descent.
Locate the runway visually. If you’re having trouble finding airports, you can pause the simulator (Escape key), use standard Google Earth to locate an airport, then resume flying. Position yourself to approach the runway from one end, not from the side.
Final Approach and Touchdown:
Align your aircraft with the runway centerline while still several miles out. Your descent rate should be gradual—about 500-700 feet per minute. Watch both your altitude and airspeed carefully.
As you near the runway threshold, reduce throttle further and adjust your pitch to maintain approach speed. The runway should appear to stay in a fixed position in your windscreen—if it’s rising, you’re descending too quickly; if it’s dropping, you’re not descending fast enough.
Just before touchdown (about 10-20 feet above the runway), reduce throttle to idle and gently pull back on the controls to flare—this raises the nose slightly and allows the main wheels to contact first. After touchdown, use the brakes (period key) to slow down.
Exploring Famous Landmarks from Above 🌍
One of the greatest joys of Google Earth’s flight simulator is the ability to fly over iconic locations worldwide. The combination of accurate geography and satellite imagery creates memorable virtual tours.
Urban Exploration:
Cities with extensive 3D building coverage offer spectacular flying experiences. San Francisco’s skyline, complete with the Golden Gate Bridge, provides dramatic scenery. New York City allows you to fly past the Statue of Liberty and through the gaps between skyscrapers (though this requires considerable skill).
London, Paris, Tokyo, and Dubai also feature detailed 3D architecture. Flying low and slow over these cities reveals the effort Google has invested in creating realistic urban environments.
Natural Wonders:
The Grand Canyon offers breathtaking views from above, with its layered rock formations clearly visible. Flying through the canyon itself presents an exciting challenge requiring precise altitude control.
Mount Everest and the Himalayan range showcase the planet’s most dramatic topography. The Swiss Alps, Norwegian fjords, and New Zealand’s mountains provide equally stunning scenery for virtual pilots seeking natural beauty.
Historical and Cultural Sites:
Fly over the Egyptian pyramids, the Great Wall of China, or Machu Picchu in Peru. These UNESCO World Heritage sites gain new perspective when viewed from a pilot’s seat. The realistic terrain allows you to appreciate both the sites themselves and their geographical context.
Troubleshooting Common Flight Issues 🔧
Even experienced virtual pilots encounter difficulties. Understanding common problems and their solutions prevents frustration.
Aircraft Control Problems:
If your aircraft seems unresponsive or erratic, first check whether a joystick or gamepad is connected. Sometimes these devices send conflicting inputs even when you’re not touching them. Disconnecting unused controllers often resolves strange behavior.
Inverted controls (pushing forward makes the nose go up) typically indicate you’re in an unusual attitude. Press the spacebar to reset to level flight, then reorient yourself using the horizon line in your HUD.
Performance and Graphics Issues:
The flight simulator requires more computing resources than standard Google Earth. If you experience stuttering or poor frame rates, try reducing graphics quality in Google Earth’s settings. Close other applications to free up memory and processing power.
Flying over areas with dense 3D buildings or complex terrain increases system demands. If performance suffers, navigate to less detailed areas or increase your altitude to reduce the detail being rendered.
Lost or Disoriented:
Getting lost or disoriented is common, especially for beginners. If you’re unsure of your location, press Escape to pause the simulator. This brings up the options menu with an “Exit Flight Simulator” option. Exiting returns you to standard Google Earth mode with the map showing your last flight position.
You can then explore the area in normal map view, identify landmarks or airports, then restart the simulator with better orientation.
Enhancing Your Experience with Joysticks and Hardware 🎛️
While the flight simulator works perfectly well with keyboard and mouse, adding flight control hardware significantly enhances realism and enjoyment.
Choosing Flight Controls:
Basic joysticks start around $30-50 and provide immediate improvement over mouse control. More advanced HOTAS (Hands On Throttle And Stick) systems costing $150-300 offer separate throttle controls and additional buttons for functions like landing gear and flaps.
For the Google Earth flight simulator’s complexity level, a mid-range joystick with throttle control provides the best value. Look for models with twist rudder control (rotating the stick left and right controls yaw) to avoid needing separate rudder pedals.
Configuration and Calibration:
After connecting your joystick, you may need to configure it through your computer’s control panel (Windows) or system preferences (Mac). Google Earth generally recognizes controllers automatically, but if something doesn’t work correctly, verify the device is properly calibrated in your operating system before launching the simulator.
Some users find they need to adjust sensitivity settings or reverse certain axes depending on their joystick model and personal preference.
Educational Applications and Learning Benefits 📚
Beyond entertainment, the flight simulator offers genuine educational value across multiple disciplines.
Geography and Cultural Awareness:
Flying between cities and across regions provides intuitive understanding of distances, geographical relationships, and topography that maps alone cannot convey. Students gain appreciation for how terrain influences human settlement, transportation routes, and political boundaries.
Exploring different parts of the world virtually encourages curiosity about other cultures and places. This can spark interest in history, languages, and global issues.
Physics and Mathematics:
Flight inherently involves physics concepts like lift, drag, thrust, and gravity. Using the simulator provides practical context for these principles. Understanding why a steeper climb reduces airspeed, or why banking affects turn radius, reinforces physics education.
Navigation requires distance calculation, bearing determination, and time estimation—practical applications of mathematics that make abstract concepts concrete.
Career Exploration:
For young people considering aviation careers, the flight simulator provides a risk-free introduction to piloting concepts. While not a substitute for actual flight training, it familiarizes users with cockpit instruments, flight procedures, and the perspective pilots experience.
Comparing Google Earth’s Simulator to Dedicated Flight Software ⚖️
Understanding where Google Earth’s offering fits in the broader flight simulation landscape helps set appropriate expectations.
Advantages of Google Earth:
The primary advantage is accessibility—it’s completely free and requires no additional purchases or subscriptions. The integration with Google’s comprehensive geographical data is unmatched; no other simulator offers the same worldwide coverage with up-to-date satellite imagery.
The simple interface and straightforward controls make it approachable for casual users who want to explore flying without investing time in learning complex systems.
Limitations Compared to Dedicated Simulators:
Professional flight simulation software like Microsoft Flight Simulator, X-Plane, or Prepar3D offers far more realistic flight models, weather simulation, and aircraft systems. These programs accurately model engine performance, fuel consumption, weight and balance, and aerodynamic effects that Google Earth simplifies or omits.
Dedicated simulators also provide working cockpit instruments, radio navigation, air traffic control interaction, and multiplayer capabilities. The aircraft selection is vastly larger, with accurately modeled variants from ultralights to jumbo jets.
The Right Tool for Your Needs:
If you’re seeking professional-level training or highly realistic aviation simulation, dedicated software is necessary. However, for geographical exploration, casual flying fun, or introducing someone to aviation concepts, Google Earth’s simulator excels. Many serious flight sim enthusiasts keep Google Earth installed specifically for quick sightseeing flights over interesting terrain.
Creative Uses and Unique Experiences 🚁
Innovative users have discovered creative applications for the flight simulator beyond straightforward flying.
Virtual Tourism:
Plan actual trips by flying over destinations beforehand. Seeing terrain from above helps you understand the layout of cities, the proximity of attractions, and the character of different neighborhoods. This aerial preview makes you a more informed traveler.
Relive past trips by flying over places you’ve visited. The recognition of landmarks and areas you walked through creates a satisfying new perspective on your memories.
Photography and Videography:
Screen recording your flights creates unique video content. Flying through dramatic landscapes or over cities during sunset (adjust the time of day in Google Earth settings before starting the simulator) produces compelling footage.
Some content creators use Google Earth flyovers in educational videos, documentaries, or presentations. The realistic terrain provides professional-looking aerial shots without expensive drone footage.
Personal Challenges and Games:
Create your own challenges: land at every airport in a region, fly under specific bridges, complete a route using only visual navigation, or maintain level flight through mountain passes without gaining or losing altitude.
These self-imposed goals add structure and achievement to the experience, increasing engagement and skill development.
Getting the Most from Your Virtual Flying Adventures 🌟
Maximizing your enjoyment requires moving beyond basic flight to develop skills and explore creatively.
Practice Regularly:
Like any skill, virtual flying improves with practice. Spend time working on specific techniques—landings one session, navigation the next. Regular short sessions develop muscle memory and instinct faster than occasional marathon flights.
Set Personal Goals:
Challenge yourself with specific objectives. Fly from your home to a famous landmark using only visual navigation. Complete a circuit landing at five different airports without crashing. Successfully navigate through a mountain range at low altitude.
These goals provide motivation and structure while building competence.
Explore Varied Terrain:
Don’t limit yourself to familiar areas. The simulator’s global coverage means you can experience flying conditions worldwide. Try island hopping in the Caribbean, crossing Australian outback, or navigating Scandinavian fjords. Each environment presents different challenges and rewards.
Learn Real Aviation Concepts:
Reading about actual aviation procedures, weather effects, and navigation techniques enriches your simulation experience. Understanding why real pilots make certain decisions adds depth to your virtual flying. Many free resources online explain aviation basics accessibly.

The Future of Flight in Google Earth 🔮
While Google hasn’t made major updates to the flight simulator in recent years, the feature continues working in Google Earth Pro, and user interest remains strong.
The aviation simulation landscape has evolved significantly since 2007. Modern cloud-streaming technology, improved graphics capabilities, and advanced physics engines have raised expectations. Whether Google will update its simulator to incorporate new technologies remains uncertain.
However, the current implementation retains value precisely because it balances simplicity with functionality. Not every experience needs to be maximally complex. Sometimes the joy comes from accessible, straightforward fun combined with the world’s best geographical data.
The simulator serves as a gateway, introducing people to flight concepts and geographical exploration. It demonstrates that sophisticated tools can be approachable, educational, and free—an increasingly rare combination in today’s software landscape.
Whether you’re seeking a few minutes of entertaining distraction, a tool for geographical education, or a platform for virtual exploration, Google Earth’s flight simulator delivers an experience that transcends its hidden status in the Tools menu. Fire up Google Earth Pro, activate the simulator, and discover why pilots say the world looks different from above—even when that world is virtual.